Integrating Paystack (Funding) in .Net Application
Using Clean Code Architecture

Hey fellow developers! Ready to dive into the world of seamless payment integration? In this article, we're going to unravel the process of integrating Paystack's funding magic into your .NET application. And guess what? We're doing it the clean way!
Clean architecture is not just a buzzword – it's your ticket to modular, testable, and maintainable code. It simply means that we will have most of the work done a service class so as to keep our controller as clean as possible. As we venture through this guide, you'll see how clean architecture principles make your codebase as smooth as Paystack's payment flows.
I'll hold your hand through each step – from snagging those precious API keys to acing withdrawal requests. Our focus? Keeping your codebase clean, logical, and ready to tackle anything your project throws at it.
So, whether you're a seasoned pro or a code newbie, buckle up! This guide is your companion to mastering Paystack funding integration in your .NET application. By the end, you'll be equipped to build payment features that not only work seamlessly but also stand tall in the face of changing business needs.
I Assume you have already setup your project.
STEP 1 : API Keys
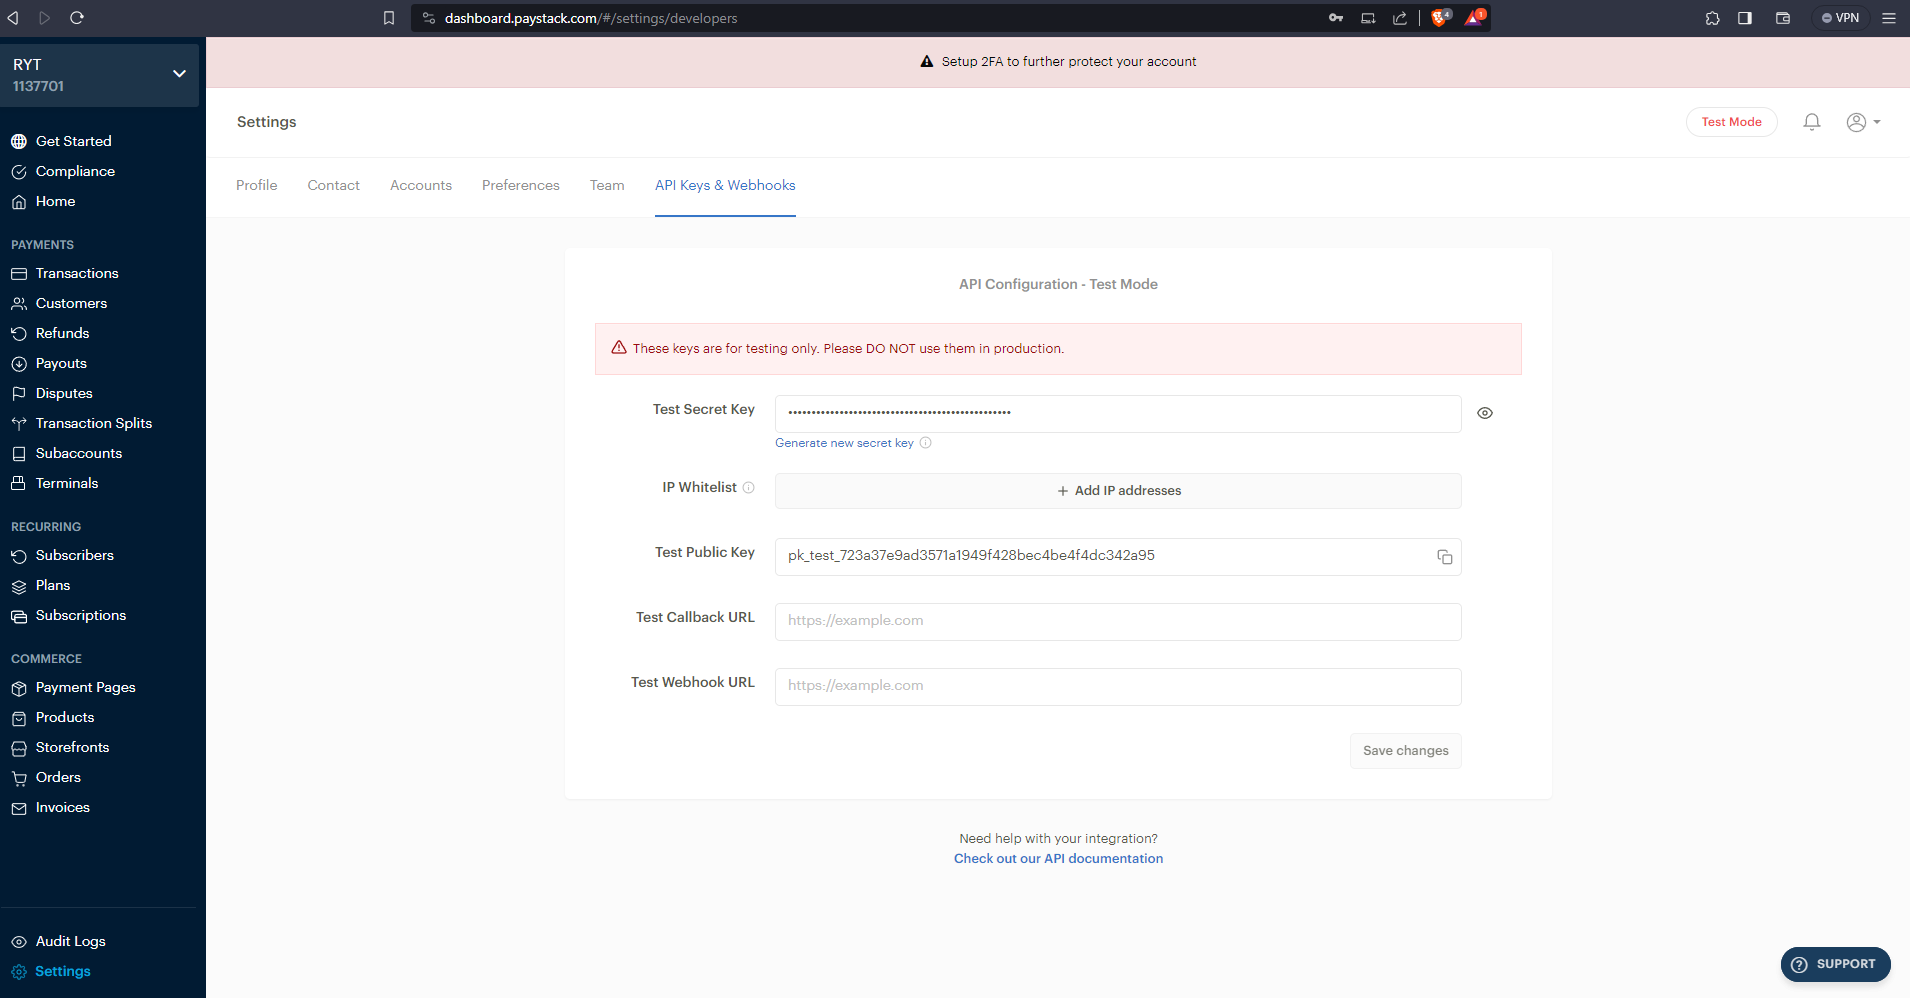
As the name implies, your API key, unlocks the Paystack payment gateway to your application. You will need to create an account with Paystack to get your keys. After a successful signup and login, navigate to the your profile page and then to API keys & Webhooks page. Click the eye button to reveal and copy (Ctrl + C or Command-C) the (Test) Secret Key. You can setup additional configurations by adding your (Test ) Webhook URL - for notifications settings and (Test) Callback URL - the page to navigate to when after every call to the Paystack API. That will be all on Paystack web page. Next Stop is our IDE.
Step 2: Modify Your appsettings.json file
"Payment": {
  "PayStack": "sk_test_0055a21846a5e1b520f0b2e8cc29a7d4b90fd6f6",
  "CallBackUrl": "https://localhost:7238/reponsePage"
}
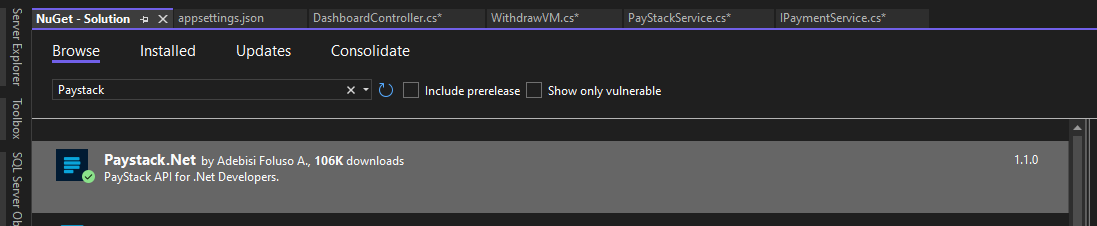
Step 3: Install Paystack NuGet package
On your menu bar>Tools>NuGet Package Manager> Manage NuGet Packages for Solution. Search Paystack under Browse.
Step 4:Set up your Payment Interface
Create a folder in root of your application or in your application layer if you adopt N-Tier architecture. I usually call mine Service. Create an Interface Class eg: IPayment.cs.
using System.Security.Claims;

namespace Demo.Services.Payment
{
    public interface IPaymentService
    {
        public Task<string> InitializePayment(SendRewardVM model, ClaimsPrincipal user);
    }
}
Step 5:Set up your Implementation Class
This is where you write your logic for interface contract.
using PayStack.Net;
using Demo.Data;
using Demo.Models.Entities;
using Demo.Models.ViewModels;
using Demo.Services.Repositories;
using Demo.Utilities;
using System.Security.Claims;

namespace Demo.Services.Payment
{
    public class PayStackService : IPaymentService
    {
        private readonly IConfiguration _configuration;
        private readonly DemoDbContext _context;
        private readonly IRepository Repository;
        private readonly string token;
        private PayStackApi PayStack { get; set; }
        public string Url { get; set; }
        public PayStackService(IConfiguration configuration, DemoDbContext context, IRepository repository)
        {
            _configuration = configuration;
            _context = context;
            Repository = repository;
            token = _configuration["Payment:PayStack"];
            PayStack = new PayStackApi(token);

        }
        public async Task<string> InitializePayment(SendRewardVM model, ClaimsPrincipal user)
        {
            // get TransactionInitializeRequest object
            TransactionInitializeRequest request = new TransactionInitializeRequest()
            {
                AmountInKobo = (int)model.Amount * 100,
                Email = demo@paystack.com,
                Currency = "NGN",
                CallbackUrl = _configuration["Payment:CallBackUrl"]
            };
            //Initiate the payment gateway call. THis will redirect you to Paystack
            TransactionInitializeResponse response = PayStack.Transactions.Initialize(request);
            if (response.Status)
            {
                Transaction transaction = new Transaction()
                {
                    Amount = model.Amount,
                    SenderId = Helper.SenderId(),
                    ReceiverId = "",
                    WalletId = "",
                    Reference = response.Data.Reference,
                    Status = false,
                    Description = model.Description,
                    TransactionType = model.TransactionType.ToString(),
                };
                //Save to your Database
                await Repository.AddAsync<Transaction>(transaction);
                Url = response.Data.AuthorizationUrl.ToString();
                //Verify transaction with your reference
                TransactionVerifyResponse verifyResponse = PayStack.Transactions.Verify(response.Data.Reference);
                if (verifyResponse.ToString() == "success")
                {
                    var transactionRef = _context.Transactions.Where(x => x.Reference == response.Data.Reference).FirstOrDefault();
                    if (transactionRef != null)
                    {
                        transaction.Status = true;
                    }
                }
                //update your database
                await Repository.UpdateAsync<Transaction>(transaction);
            }
            return Url;
        }
    }
}
A more standard approach is to abstract your models and create a helper class to handle the processing of your transaction parameters like walletId, ReceiverId, etc.
using PayStack.Net;
using Demo.Data;
using Demo.Models.Entities;
using Demo.Models.ViewModels;
using Demo.Services.Repositories;
using Demo.Utilities;
using System.Security.Claims;

namespace Demo.Services.Payment
{
    public class PayStackService : IPaymentService
    {
        private readonly IConfiguration _configuration;
        private readonly DemoDbContext _context;
        private readonly IRepository Repository;
        private readonly string token;
        private PayStackApi PayStack { get; set; }
        public string Url { get; set; }
        public PayStackService(IConfiguration configuration, DemoDbContext context, IRepository repository)
        {
            _configuration = configuration;
            _context = context;
            Repository = repository;
            token = _configuration["Payment:PayStack"];
            PayStack = new PayStackApi(token);

        }
public async Task<bool> InitializePayment(SendRewardVM model)
        {
            var senderEmail = (await _repository.GetAsync<AppUser>())
                .Where(s => s.Id == model.SenderId)
                .Select(s => s.Email)
                .First();

            var request = new TransactionInitializeRequest
            {
                AmountInKobo = (int)model.Amount * 100,
                Email = senderEmail,
                Currency = "NGN",
                CallbackUrl = _configuration["Payment:PayStackCallbackUrl"],
                Reference = TransactionHelper.GenerateTransRef(),
            };

            var response = _payStack.Transactions.Initialize(request);

            if (!response.Status) return false;

            var transaction = new Transaction
            {
                Amount = model.Amount,
                SenderId = model.SenderId,
                ReceiverId = model.ReceiverId,
                WalletId = model.WalletId,
                Reference = response.Data.Reference,
                Status = false,
                Description = model.Description,
                TransactionType = model.TransactionType,
            };
            await _repository.AddAsync(transaction);
            Url = response.Data.AuthorizationUrl;

            //Verify transaction
            var verifyResponse = _payStack.Transactions.Verify(response.Data.Reference);

            if (verifyResponse.ToString() != "success")
                return false;

            transaction.Status = true;

            await _repository.UpdateAsync(transaction);

            return true;
        }
Step 6: Register Your Interface
This step is very important because your application will break if you miss it. This enable Dependency Injection to work. The beauty of this is that if you wish to implement any other payment processor other than Paystack, all you need to do is to replace PayStackService with your new implementation class. Next Stop is the controller.
builder.Services.AddScoped<IPaymentService, PayStackService>();
Step 7: Call your Service to Controller
Create a HttpPost Request and create a method that call the InitializePayment
[HttpPost]
public async Task<IActionResult> PayStack(SendRewardVM sendRewardVM)
{
    var payStack = await _paymentService.InitializePayment(sendRewardVM, User);

    if (payStack == null)
    {
        //ViewData send error message
        return RedirectToAction("Index");
    }
    return Redirect(payStack);
}
Before the step above, inject your IPaymentService
private readonly IPaymentService _paymentService;

        public DashboardController(IPaymentService paymentService)
        {
            _paymentService = paymentService;
        }
Finally Step: Create your View and Build your Application